Contents
Sprites
Learn how to create sprite animations
Sprites are special images that can be used to create animations, kind of like a flip book. To create a sprite animation, first you’ll need an image which contains each frame of your animation. Let’s start with a simple example.
Take this sprite sheet of a coin rotating:

Each frame is 84 pixels wide, so that’s what we’ll set as our clipping width. The clipping height will automatically be set as the image height. Let’s also have the coin animation advance to the next frame at 300 milliseconds and loop when it gets to the end. Our coin should look like it’s continuously rotating in a smooth animation. Here’s how we’ll create the sprite in Ruby:
coin = Sprite.new(
  'coin.png',
  clip_width: 84,
  time: 300,
  loop: true
)
We can then play the sprite animation by using the play method:
coin.play
Here’s what our animation looks like:
Just like regular images, you can also set the x and y position of the sprite, along with its width, height, and color. To stop the sprite playing in this example, simply call coin.stop.
Some sprite sheets are meant to be played once, like an explosion. Take this sprite image:

To play this through, we’ll set the clip width to be 127 pixels and the frames to advance every 75 milliseconds.
boom = Sprite.new(
  'boom.png',
  clip_width: 127,
  time: 75
)
Let’s play this animation, but also print a message when it’s done:
boom.play do
  puts "Animation finished!"
end
Here’s what our animation looks like:
So far, we’ve only focused on a single animation, but what if we want to have many in a single sprite sheet? A perfect example might be a hero character in our game, where the sprite sheet image might look like this:

The sheet has seven images of the character in four different poses: standing, walking, climbing, and cheering. When creating a new instance from the Sprite class, we can use the animation attribute to set multiple animations. Each animation needs a name and a frame range, using Ruby’s .. range operator. Let’s see what this would look like.
hero = Sprite.new(
  'hero.png',
  width: 78,
  height: 99,
  clip_width: 78,
  time: 250,
  animations: {
    walk: 1..2,
    climb: 3..4,
    cheer: 5..6
  }
)
We could combine this with input events to animate the sprite with arrow keys:
on :key_down do |event|
  case event.key
    when 'left'
      hero.play animation: :walk, loop: true, flip: :horizontal
    when 'right'
      hero.play animation: :walk, loop: true
    when 'up'
      hero.play animation: :climb, loop: true
    when 'down'
      hero.play animation: :climb, loop: true, flip: :vertical
    when 'c'
      hero.play animation: :cheer
  end
end
Here’s what each animation looks like:
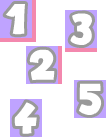
In the most complex case, we may want to specify a different clipping rectangle for every frame. Instead of an animation frame range, we provide an array containing the size of the clipping rectangle and the time in milliseconds it should be displayed. Take this sprite atlas with numbers of different sizes scattered about:

We can “cut out” each number like so:
atlas = Sprite.new(
  'atlas.png',
  animations: {
    count: [
      {
        x: 0, y: 0,
        width: 35, height: 41,
        time: 300
      },
      {
        x: 26, y: 46,
        width: 35, height: 38,
        time: 400
      },
      {
        x: 65, y: 10,
        width: 32, height: 41,
        time: 500
      },
      {
        x: 10, y: 99,
        width: 32, height: 38,
        time: 600
      },
      {
        x: 74, y: 80,
        width: 32, height: 38,
        time: 700
      }
    ]
  }
)
Then play the :count animation on a loop like so:
atlas.play animation: :count, loop: true
Here’s what the animation looks like:
Continue to the next topic ▸