2D basics
Learn the fundamentals of 2D graphics
Before we start making some graphics, let’s cover the basics.
Coordinate system
First, it’s important to know that visible objects drawn in the window follow a coordinate system. Instead of something you might be familiar with from your math classes, this system has its origin, or (0, 0), in the upper-left corner, and the x and y values get larger toward the bottom-right. This might seem odd, but it’s actually common in 2D computer graphics.
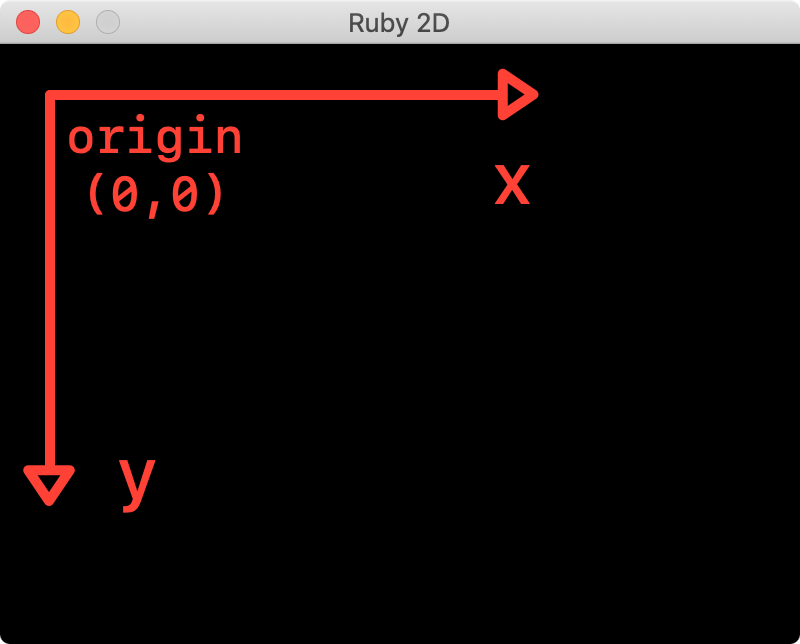
In this documentation, x is the x-coordinate and y is the y-coordinate. When an object has multiple pairs of x and y coordinates, they will be numbered, for example: x1, y1 or x2, y2.
Aligning to the window
Sometimes you don’t want to compute coordinates by hand: you just want a piece of Text pinned to the middle of the window, or a logo tucked into the top-right corner. Instead of a number, pass a symbol to x: or y: and Ruby 2D figures it out for you:
Text.new('Paused', x: :center, y: :center)
Image.new('logo.png', x: :right, y: :top)
Rectangle.new(x: :center, y: :bottom, width: 200, height: 40)
Button.new(x: :center, y: :bottom, width: 220, height: 40, label: 'Start')
For x:, you can use :left, :center, or :right. For y:, use :top, :center, or :bottom. This works on anything with a well-defined bounding box: Text, Rectangle, Square, Circle, Ellipse, Image, Sprite, and Button. The center-anchored Circle and Ellipse align their bounding box just like a rectangle (:left puts the left edge against the wall, :center centers it) and the anchor follows along.
The clever bit is that alignment is resolved at draw time, not when you create the object. So a :center-aligned Text re-centers itself when you change its content, and aligned objects follow along when the window resizes. You don’t need to know the window’s dimensions up front. The old idiom of constructing a Text, reading its width, and assigning x = (WIDTH - text.width) / 2 is a thing of the past.
Reading the position back always gives you a number. obj.x and obj.y return the resolved pixel coordinates, so contains?, hit-testing, and event handlers keep working as before. If you want to know the intent — whether something was aligned and how — read obj.x_align and obj.y_align. Assigning works the way you’d expect: a number clears the alignment, a symbol sets it.
text = Text.new('Hi', x: :center)
text.x         # => resolved pixel value
text.x_align   # => :center
text.x = 100   # clears alignment, x is now 100
text.x = :right  # back to alignment, this time on the right edge
Padding
By default, an aligned object sits flush against the edge it’s anchored to. Sometimes that’s what you want; other times you’d like a little room to breathe. Pass padding: and it becomes the gap, in pixels, between the object and the window edge:
Text.new('Score: 0', x: :right, y: :top, padding: 16)
Button.new(x: :center, y: :bottom, padding_bottom: 24, label: 'Start')
Image.new('logo.png', x: :right, y: :top, padding: 20, padding_right: 60)
A bare padding: sets all four edges at once. The per-edge variants (padding_top:, padding_right:, padding_bottom:, padding_left:) override individual sides. You can mix the two: padding: 20, padding_top: 8 gives 8 on top and 20 elsewhere.
Padding only kicks in on edges you’ve actually aligned to. A :center axis ignores it (there’s no edge to push away from), and so does an axis you’ve given a numeric position. Negative values are fine if you want the object to peek past the edge, useful for partial-clipping effects.
You can read and write padding at runtime, the same way as everything else:
obj.padding_top = 8
obj.padding = 20   # sets all four edges at once
The classic HUD-score idiom collapses nicely:
# Before: alignment plus margin math after the fact
score = Text.new('Score: 0', x: 0, y: 16, size: 18)
score.x = Window.width - score.width - 16
# (and you'd recompute on every content change, and on every resize)

# After
score = Text.new('Score: 0', x: :right, y: :top, padding: 16, size: 18)
The 16-pixel gap stays consistent through content changes and window resizes — same deal as alignment itself.
A few things to know
- Aligned positions return
0until the first frame draws. The window’s viewport dimensions aren’t known untilshowstarts running, so readingobj.xbefore then sees a placeholder. - The centroid-anchored shapes (
Triangle,Quad,Polygon, andPolyline) have no edge to hug, so they don’t accept symbolic alignment or padding; neither doCanvasorBitmapText. Passing a symbol to any of theirx:/y:raises a clearRuby2D::Errorrather than guessing. Reach forTextwhen you need aligned text, or wrap a shape in aRectangle. (ALinehas nox/yat all; it’s positioned through its endpointsx1/y1/x2/y2.)
Adding and removing objects
All objects that can be drawn in the window are added automatically. When you called Triangle.new in the “get started” tutorial, its add method was called for you, which added the triangle to the window. If you want to remove an object from the window, simply call remove. Here’s an example showing how to remove, then add a shape back to the window:
s = Square.new  # a square is created and added to the window
s.remove  # square is removed...
s.add     # ...and added back to the window
All objects can be removed from the window by simply calling clear:
Triangle.new
Square.new
clear  # everything now gone from the window
If you want to skip drawing an object for a few frames without actually removing it (so it keeps its z-order and any per-object event handlers), use hide and show instead:
s = Square.new
s.hide   # still in the scene, just not drawn this frame
s.show   # drawing again
Reach for remove and add for genuine lifecycle changes; reach for hide and show for cheap per-frame toggles like a blinking cursor or a paused entity.
Depth
Objects are drawn in the order they are created. For example, if you call Triangle.new and then Square.new, the triangle will be behind the square. You can override this behavior by setting a “z-index” for the object. An object with a higher index will be “above” (in front) of another with a lower value. All objects start with a z-index of 0.
For example, to make the following triangle appear above the square, we can set it’s z-index like so:
t = Triangle.new
s = Square.new
t.z = 1
Contains
You can check if a point is within the bounds of an object by calling its contains? method like so:
s = Square.new(x: 50, y: 50, size: 100)
s.contains? 75, 75  # returns true
s.contains? 10, 20  # returns false
Example of moving a square shape with keys
require 'ruby2d'

# Define a square shape
@square = Square.new(x: 10, y: 20, size: 25, color: 'blue')

# Define the initial speed (and direction)
@x_speed = 0
@y_speed = 0

# Define what happens when a specific key is pressed
# Each keypress influences on the  movement along the x and y axis
on :key_down do |event|
  if event.key? :j
    @x_speed = -2
    @y_speed = 0
  elsif event.key? :l
    @x_speed = 2
    @y_speed = 0
  elsif event.key? :i
    @x_speed = 0
    @y_speed = -2
  elsif event.key? :k
    @x_speed = 0
    @y_speed = 2
  end
end

update do
  @square.x += @x_speed
  @square.y += @y_speed
end

show
Continue to the next topic